Reclaiming Your Time: Why This Deriv DBot Tutorial for Beginners Matters
I remember the first time I tried to trade the markets manually. It was 3 AM, I had three cups of cold coffee on my desk, and I was staring at a 5-minute candle chart like it held the secrets to the universe. My eyes were burning, my brain was foggy, and I eventually made a impulsive trade out of sheer exhaustion. Needless to say, it didn’t end well.
Sound familiar? The psychological toll of manual trading is heavy. That is exactly why I’m excited you’re reading this deriv dbot tutorial for beginners. In 2026, we have tools that allow us to step away from the screen without missing out on market movements. DBot isn’t some complex coding platform reserved for Wall Street quants; it is a visual, drag-and-drop builder designed for people like you and me who want to automate a strategy and go live our lives.
What Exactly is Deriv DBot?
Before we dive into the technical bits, let’s clear the air. DBot is a web-based platform by Deriv that lets you build trading robots using “blocks.” Think of it like LEGO for finance. You don’t need to know a single line of Python or C++. If you can drag a block that says “If RSI is above 70” and snap it to a block that says “Sell,” you are already halfway to becoming an automated trader.
The beauty of this system is that it removes the most dangerous element of trading: human emotion. A bot doesn’t get greedy. It doesn’t get “revenge” after a losing trade. It just follows the instructions you gave it, 24/7. Whether you want to trade Volatility Indices, Forex, or Commodities, this deriv dbot tutorial for beginners will show you how to set the foundation.

Getting Started: Your First Steps on the Platform
First things first, you need a Deriv account. If you already have one for MT5 or DTrader, you’re good to go. Once you’re logged in, navigate to the top-left menu and select DBot. You’ll be greeted by a clean, open canvas. This is your workshop.
I always tell people to start with the “Demo Account.” I cannot stress this enough. Even in 2026, with all our technological advancements, the market can still throw curveballs. The demo account gives you virtual funds to test your logic. If your bot has a flaw, you want to find it using fake money, not your hard-earned savings.
Navigating the Interface
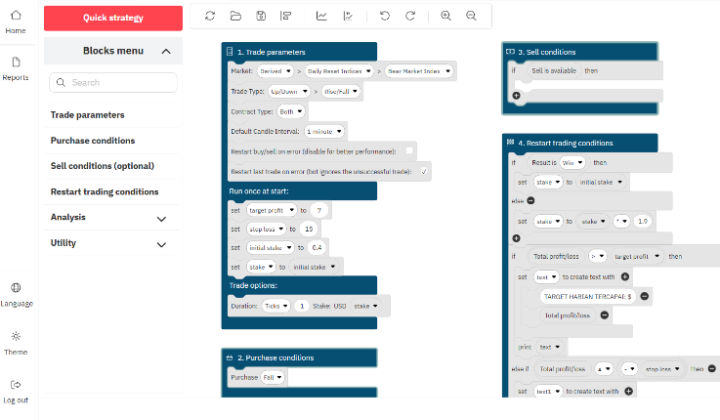
The interface can look a bit intimidating at first, but let’s break it down into three main areas:
- The Block Menu: Located on the left side, this is where your tools live. It’s categorized into Logic, Math, Text, and specific Trading actions.
- The Canvas: The big space in the middle where you drag and connect your blocks.
- The Dashboard: This is where you see your bot in action once you hit the “Run” button. It shows your profit, loss, and the history of trades.
The Anatomy of a Trading Bot: The Four Essential Blocks
Every bot you build on Deriv, no matter how complex, relies on four mandatory blocks. Think of these as the pillars of your trading house. Without them, the bot simply won’t run.
1. Trade Parameters (Block 1)
This is where you tell the bot what to trade. You’ll select the market (e.g., Volatility 100 Index), the type of trade (e.g., Rise/Fall or Even/Odd), and your stake amount. You also set your “Trade Restart” logic here. Do you want the bot to stop after a certain profit? This is the place to define those boundaries.
2. Purchase Conditions (Block 2)
This is the “Brain” of your bot. In this block, you define the logic that triggers a trade. For example, “Purchase ‘Rise’ if the last tick is higher than the previous one.” This is where most of your strategy development happens. We’ll look at a simple example shortly.
3. Sell Conditions (Block 3)
For most beginner strategies (like binary options style trades), this block is often left empty or used for early exits. If you are trading contracts that allow you to sell before expiry, you’d put that logic here. For now, don’t worry too much about this one.
4. Post-Trade Actions (Block 4)
What happens after a trade finishes? This is arguably the most important block for risk management. Do you want to double the stake after a loss (Martingale)? Do you want to wait 60 seconds before the next trade? This block handles the “what next?” part of the cycle.

Building Your First Simple Strategy: A Practical Guide
Let’s get our hands dirty. For this deriv dbot tutorial for beginners, we aren’t going to build a NASA-level algorithm. We are going to build a simple “Trend Follower” bot. This will help you understand how the blocks interact.
Step 1: Set the Market
In Block 1, select Synthetic Indices -> Continuous Indices -> Volatility 10 Index. Set the contract type to Rise/Fall and the duration to 5 Ticks.
Step 2: Define the Entry Logic
Go to the “Logic” category in the menu and grab an “If / Do” block. Place it inside Block 2. Now, go to “Tick Analysis” and grab the “Last Tick” block. We want to tell the bot: “If the last tick is greater than the one before it, Buy a Rise contract.” It sounds simple, but it’s a fundamental way to catch short-term momentum.
Step 3: Manage the Outcome
In Block 4, we want the bot to keep running. Drag a “Trade Again” block into the slot. But wait! Let’s add a safety net. Use a logic block to say: “If Total Profit is less than $10, Trade Again.” This ensures your bot stops once it hits your daily goal. It’s a great way to prevent “over-trading,” which is a silent killer of accounts.
Risk Management: The Difference Between Success and Bust
I’ve seen countless traders build amazing bots only to watch them blow up their accounts because they ignored risk management. Automated trading is fast. If your bot is set up to double its stake every time it loses (a classic Martingale strategy), things can spiral out of control very quickly.
Keep these tips in mind as you start experimenting:
- Set a Hard Stop-Loss: Always define a maximum loss for the session. If the bot hits that number, it should shut down immediately. No exceptions.
- Start Small: Your stake should be a tiny fraction of your balance. If you have $100, don’t stake $10 per trade. Start with $0.35 or $1.
- Avoid the “Get Rich Quick” Bots: You’ll see people online selling “guaranteed” DBot scripts. Let me save you some money: they don’t work. The best bot is the one you understand and built yourself because you know its weaknesses.
The 2026 Perspective: Using Indicators in DBot
As we move through 2026, the data available within DBot has become incredibly robust. You can now easily integrate technical indicators like the Relative Strength Index (RSI), Bollinger Bands, and Moving Averages.
Instead of just looking at the “Last Tick,” you can set the bot to only trade when the RSI is below 30 (oversold) and the price is touching the lower Bollinger Band. This adds layers of confirmation to your trades. In this deriv dbot tutorial for beginners, I suggest you start with one indicator at a time. Mixing five different indicators often leads to “analysis paralysis” for your bot, where it never finds a perfect entry and just sits there idle.
Common Pitfalls to Avoid
Even with a solid deriv dbot tutorial for beginners, you’re bound to make some mistakes. That’s part of the journey. However, there are a few big ones you can avoid right now:
One major mistake is running a bot during high-impact news events. Even though Synthetic Indices are simulated, they are designed to mimic real market behavior. During extreme volatility, your bot’s logic might execute trades at unfavorable prices (slippage). It’s often better to run your bot during “quiet” market hours when trends are more predictable.
Another pitfall is “Set it and Forget it.” While automation is the goal, you should still check in on your bot every hour or so. Technology isn’t perfect. Your internet might flicker, or the platform might undergo maintenance. A quick glance at the dashboard can save you a lot of stress.
Testing and Optimization: The “Backtesting” Secret
Before you ever click that green “Run” button on a real account, you should put your bot through its paces. On the DBot platform, you can use the “Journal” tab to see exactly why a trade was taken or why it failed. Use this data to tweak your blocks.
Maybe 5 ticks is too short? Try 10. Maybe the RSI threshold of 70 is too high? Try 65. This iterative process is what separates the hobbyists from the serious traders. You are essentially a scientist now, and the canvas is your lab.
Wrapping Up Your Automation Journey
Automating your trading through this deriv dbot tutorial for beginners is one of the most empowering things you can do for your financial journey. It shifts you from being a reactive participant in the market to being a proactive manager of a system.
Don’t feel rushed to create the perfect bot on day one. Start with the basic blocks, get comfortable with the interface, and spend plenty of time in the demo environment. Trading is a marathon, not a sprint. By using DBot, you’re giving yourself the advantage of consistency and discipline—two things that human nature often struggles with.
Take it slow, keep learning, and most importantly, enjoy the process of building something that works for you. The world of automated trading is vast, and you’ve just taken the first, most important step. Happy building!